REVIEW · CHINATOWN, LITTLE INDIA & KAMPONG GLAM WALKING TOURS
Instawalk with Phonetography of Iconic Singapore
Book on Viator →Operated by PHOTOWALKS.SG · Bookable on Viator
Your phone becomes the main camera. In a tight 1.5-hour Instawalk setup, you get guided angles around Singapore’s most recognizable bay sights, with a photographer focused on how you look and where your shot lands.
Two things I really like: first, the hands-on pose and lighting guidance that helps you look natural even if you feel awkward in front of a camera. Second, the “unlimited” promise within the time window—so you’re not stuck praying for one good photo; you get a mix of candid, off-the-cuff moments, and more posed portraits.
The main drawback to consider is that the session style is still a walk-and-shoot, not a full-on coaching class. One person wanted more explicit posing direction, and if you’re very specific about the exact images you need for social media, you may want to ask for extra guidance on the spot.
In This Review
- Key takeaways before you go
- What you’re really booking: a 90-minute “phonetography” session
- Starting at Starbucks Gardens by the Bay: logistics that actually matter
- Marina Bay first: the skyline look that works for both couples and solo shots
- Bayfront Pavilion to Marina Bay Sands: turning big landmarks into flattering portraits
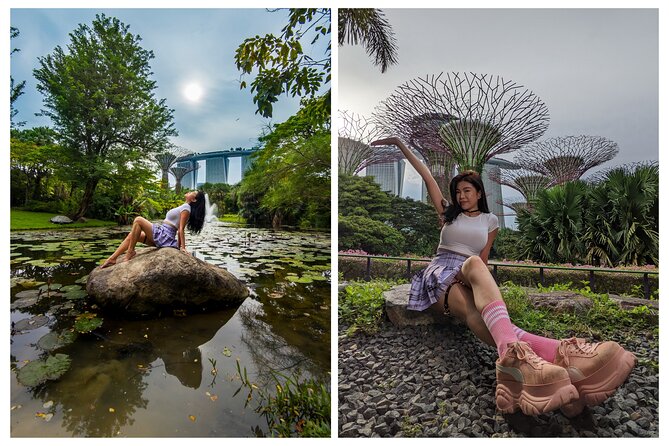
- Gardens by the Bay and Supertree Grove: color, scale, and easy posing cues
- Dragonfly Lake and Dragonfly Bridge: where “candid” photos can steal the show
- The photographers’ style: what I’d expect from Hai and Alex
- Unlimited full-HD downloads: how to get the most out of it
- Your 90-minute route: why “iconic stops” work better than wandering
- Price and value: does $175.70 make sense for you?
- Who should book this Instawalk (and who might not)
- Quick care checklist so your photos come out strong
- Should you book this phone photo Instawalk?
- FAQ
- How much does the Instawalk with Phonetography of Iconic Singapore cost?
- How long is the tour?
- Is this a private tour?
- Where do we meet and where does it end?
- What places are included for photos?
- Do you receive the photos as downloads, and are they high quality?
- What happens if the weather is bad?
- What is the cancellation policy?
- Is the tour suitable for most people and can I bring a service animal?
Key takeaways before you go
- Private and photo-led: only your group, moving through iconic Marina Bay locations with a photographer.
- Unlimited full-HD downloads: high-quality photos during the session, including candid shots.
- Pose help when you need it: tips on how to stand, turn, and work angles.
- Icon spots in a short route: from Bayfront Pavilion and Gardens by the Bay to Supertree Grove and Marina Bay Sands.
- Weather-dependent: good weather matters, and poor weather can mean a different date or a refund.
What you’re really booking: a 90-minute “phonetography” session
This experience is built for people who want Singapore photos that look like they came from a content creator, but without dragging a whole photo setup along. You’re not just taking pictures as you walk—you’re being positioned, guided, and photographed with Singapore’s most photo-friendly backdrops.
The pitch is simple: you’ll capture your best angles in a beautiful city, with candid shots and posed portraits while you sightsee. That matters because most “selfie + scenic walk” trips leave you with either great views but awkward faces, or great faces but mediocre compositions.
At $175.70 per person, the value comes from what’s included: unlimited high-quality photos in the time frame, plus a photographer who’s there to help you get the timing, angle, and lighting working for you. If you enjoy photography but hate guessing where to stand, this is the part you’re paying for.
You can also read our reviews of more tours and experiences in Singapore.


Starting at Starbucks Gardens by the Bay: logistics that actually matter
The meeting point is at Starbucks Gardens by the Bay, 18 Marina Gardens Dr, #02-03, Singapore 018953. The tour ends back at the same place, so you don’t have to worry about getting stranded across the city after the shoot.
You’ll get a mobile ticket, and the area is described as near public transportation, which is a big deal in Singapore. In practice, you’ll want to arrive a few minutes early so you can start shooting right away instead of losing your best light window to “where is everyone?”
This is also a “good weather” experience. If conditions are poor, you’ll be offered a different date or a full refund. That’s worth taking seriously because photography around Marina Bay is all about reflections, sky brightness, and overall visibility.
Marina Bay first: the skyline look that works for both couples and solo shots
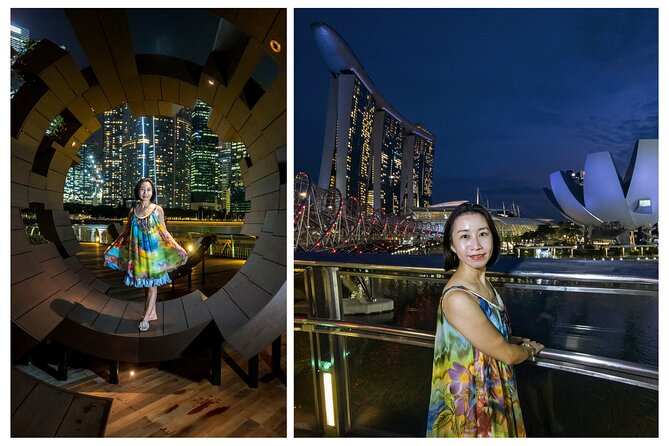
Your session starts in the Marina Bay area, and it makes sense. This zone gives you big, iconic lines—so even if your phone camera struggles in low light, you still get strong structure: the skyline shapes, waterfront angles, and dramatic city silhouettes.
A short session means you don’t waste time chasing random angles. You’ll be guided toward instantly recognizable compositions, and you’ll get both candid and posed frames as you move through the area. The goal is simple: you should leave with photos that look intentional, not just “we were there.”
Practical tip: if you’re thinking about posting soon, tell your photographer early what you want most—profile-style portraits, skyline-with-you shots, or a mix. The faster you set that expectation, the easier it is for the photographer to steer you toward the right corners of the view.
Bayfront Pavilion to Marina Bay Sands: turning big landmarks into flattering portraits
This part of Singapore has a way of turning even quick snapshots into “this looks expensive” images. The key is how you’re framed in relation to the architecture—something your photographer will handle while you focus on staying comfortable and moving naturally.
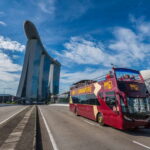
Marina Bay Sands is one of those landmarks that can either look amazing or look like a generic background, depending on the angle. A good photographer helps you avoid the common problem: you end up too centered or too far away, and the landmark overpowers you (or the reverse).
You’ll likely get a mix of:
- shots where the landmark is the star
- portraits where you’re clearly the subject
- quick variations to capture different moods
If you care about social media performance, this mix is gold because it gives you multiple “post types” from the same 90 minutes—story-friendly candid frames and feed-ready posed portraits.
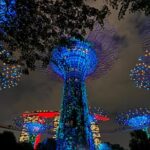
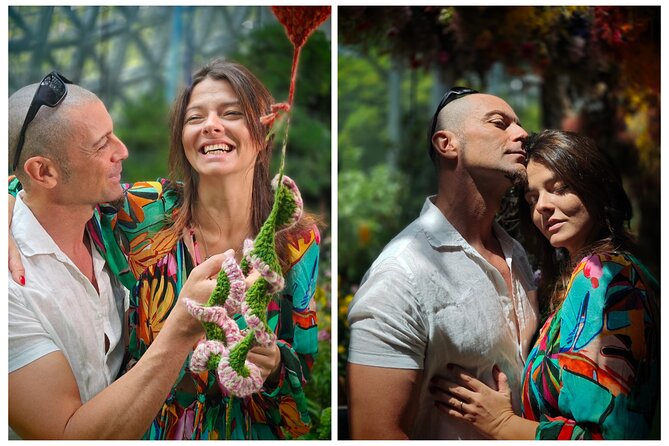
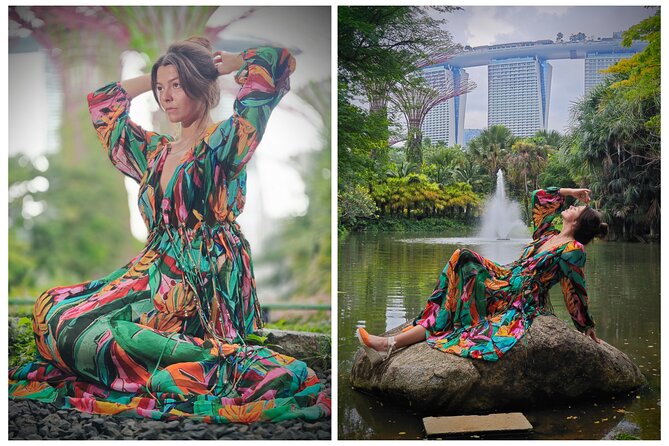
Gardens by the Bay and Supertree Grove: color, scale, and easy posing cues
Then the experience shifts into greenery and statement structures—Gardens by the Bay and Supertree Grove. This is a smart contrast to the skyline because the setting offers built-in visual texture, so your photos don’t feel flat even if your pose is simple.
Supertree Grove also gives you “working angles.” Instead of standing in an empty plaza and hoping for the best, you can use the lines of the structures to guide where you turn your body and how you angle your phone.
Two small considerations if you’re aiming for consistently sharp images:
1) You’ll be walking and repositioning, so keep your phone charged and ready.
2) If your phone has trouble with motion blur, you’ll benefit from following the photographer’s pace rather than trying to take your own shots at every step.
One review highlighted how the photographer actively coached poses and lighting, which is exactly what you need here. Big structures can look dramatic, but they can also make people look stiff if no one tells you what to do with your hands, shoulders, and chin.


Dragonfly Lake and Dragonfly Bridge: where “candid” photos can steal the show
The route can include Dragonfly Lake and Dragonfly Bridge, which are great for two reasons. First, the background feels natural and Singapore-specific, not just another city skyline view. Second, water and bridge angles give you easy depth—your photos look more layered, even with a phone camera.
This is where candid/off-the-cuff shots can really shine, because you’re not only posing; you’re moving through a scenic scene. A photographer who understands “timing” will catch you mid-step, mid-turn, or in a relaxed moment, which is the kind of photo you can actually post without overthinking.
If you tend to freeze in photos, pay attention when the photographer calls out directions. In the best moments, you’ll feel like you’re being treated like a real person exploring Singapore—not like you’re being directed to stand perfectly still for a photo you’re anxious about.
The photographers’ style: what I’d expect from Hai and Alex

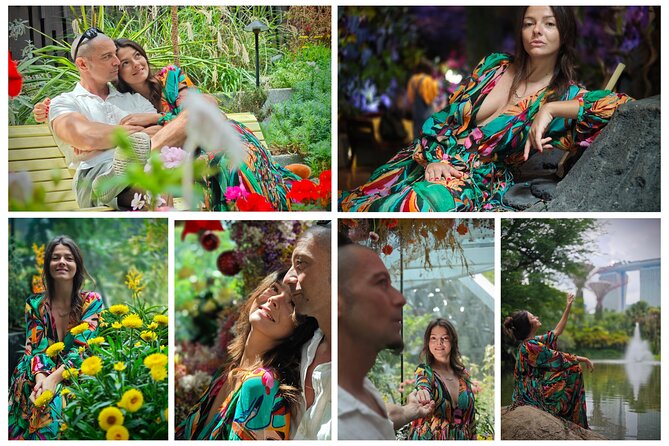
Two names came up in standout feedback: Hai and Alex. Hai was described as passionate, professional, and great at working with people who feel nervous or awkward in front of the camera. Alex was praised for strong angles and a fun “team” energy while they moved through the bay area.
If you’re camera-shy, this matters. A phone photo session can feel intense if the photographer only hands you a phone and tells you where to point it. The better approach (and what’s reflected in the higher scores) is active coaching—poses, lighting choices, and guidance on what direction your body should face.
Communication also showed up in good reviews. One person noted responsiveness through WhatsApp, which is useful for last-minute questions or clarifying what look you want.
Unlimited full-HD downloads: how to get the most out of it
You’ll receive unlimited high-quality photos captured during the time window, including candid and off-the-cuff shots, downloadable in full HD. “Unlimited” doesn’t mean every frame will be magazine-perfect, but it does mean you’re more likely to leave with enough keepers to actually post.
Think of it like this: in 90 minutes, you need coverage. If you only get a few photos, one bad blink can ruin your set. With many shots, you get options—different expressions, slight angle variations, and photos where the landmark lines up better behind you.
That said, one lower-rated review suggested that the photography and pose instructions didn’t match what they were hoping for. Their feedback boiled down to wanting more direct instruction for specific social media needs. My practical take: if you want very particular results, say so early and ask for more posing direction during the walk.
Your 90-minute route: why “iconic stops” work better than wandering
The experience is designed around instantly recognizable locations, chosen for visual composition, color, and iconic significance. Translation: you’re not wasting time hunting for good backgrounds—you’re given a sequence where each stop supports the next shot.
In a city like Singapore, where everything is spread out, wandering randomly can cost you the best light and your energy. A guided route gives you structure, and it helps you focus on being photographed instead of figuring out transport and positioning.
Because this is private, the pacing can adjust to your group. A couple might move differently than a solo traveler who wants more portrait time. You’re also not juggling strangers, so you can ask questions without feeling rushed.
Price and value: does $175.70 make sense for you?
Let’s talk real value. You’re paying for three things:
- A private photographer who knows where to stand and when to shoot
- Pose and lighting guidance, which saves you from trial-and-error
- Unlimited full-HD downloads in 1.5 hours, so you leave with options
If you’re the kind of person who always comes home with only a few usable photos, this can be a money-saver. It’s also appealing for locals who want polished images of Singapore without turning it into a full project.
If, on the other hand, you’re perfectly happy taking your own photos with minimal help, the price may feel steep for 90 minutes. In that case, a self-guided photo walk might be enough—especially if you already know the best angles you like.
One smart workaround for people who want tighter control: bring your own gear if it’s part of your style. A reviewer suggested using a tripod with a remote for the kind of control they wanted. You don’t have to do that for everyone, but it’s a helpful idea if you’re very particular about the exact shot setup.
Who should book this Instawalk (and who might not)
This is a great fit if you want:
- photos for your feed or profile that look “worked on,” not accidental
- a camera-shy confidence boost through coaching
- a fast, iconic route without planning every stop
It’s also a solid option for couples. Several comments pointed to the guide helping people relax, and that’s exactly what couples need because you’re often managing nervousness plus hand-holding plus trying not to awkwardly pose.
It may be less ideal if you need constant, step-by-step posing instructions at every single frame. If that’s you, ask upfront for extra direction so you get the style you want instead of hoping it clicks during the walk.
Quick care checklist so your photos come out strong
This tour is phone-first, and your results depend on your phone behaving well. Before you meet:
- fully charge your phone
- free up storage so you don’t worry during the shoot
- wear comfortable shoes you can walk in for 1.5 hours
During the walk, keep your phone ready but let the photographer lead. The whole point is that you’ll get a guided sequence with built-in composition, rather than stopping every few steps to reframe.
Should you book this phone photo Instawalk?
Book it if you want a private, guided way to get high-quality Singapore portraits and landmark shots without planning a route. The combination of pose guidance, iconic Marina Bay locations, and unlimited full-HD downloads is the core value—and it’s exactly what drove most high ratings.
Skip or adjust your expectations if you’re extremely specific about shot planning and want highly customized posing for every photo. If that’s the case, tell your photographer what you want as early as possible, and consider bringing small tools like a tripod and remote if you already use them.
If you’re aiming for a confident set of photos from Singapore’s bay area in a short time, this is one of the more practical ways to do it.
FAQ
How much does the Instawalk with Phonetography of Iconic Singapore cost?
The price is $175.70 per person.
How long is the tour?
It runs for about 1 hour 30 minutes.
Is this a private tour?
Yes. It’s private, so only your group participates.
Where do we meet and where does it end?
You meet at Starbucks Gardens by the Bay, 18 Marina Gardens Dr, #02-03 Gardens by the Bay, Singapore 018953. The activity ends back at the same meeting point.
What places are included for photos?
The experience includes iconic locations such as Bayfront Pavilion, Gardens by the Bay, Supertree Grove, Dragonfly Lake, Dragonfly Bridge, and Marina Bay Sands.
Do you receive the photos as downloads, and are they high quality?
Yes. You get unlimited high-quality photos shot within the time frame, inclusive of candid and off-the-cuff shots, downloadable in full HD.
What happens if the weather is bad?
This experience requires good weather. If it’s canceled due to poor weather, you’ll be offered a different date or a full refund.
What is the cancellation policy?
You can cancel for a full refund up to 24 hours before the experience starts. If you cancel within 24 hours of the start time, the amount you paid won’t be refunded.
Is the tour suitable for most people and can I bring a service animal?
Most travelers can participate, and service animals are allowed. The meeting area is also described as near public transportation.